What is Console?
Console is a project developed by Helium. It provides a web browser front-end for users to manage organizations and devices and a Helium Blockchain-compatible LoRaWAN Network Server (LNS) called Router.
We are working on integrations with third-party LNS's such as Chirpstack, but at this time, this is the only "plug-and-play" solution for operating an OUI. That being said, the Router code is open-source and custom LNS implementations may be derived by anyone already since OUI operation on the Helium Network is entirely permissionless.
Requirements
Before we begin, you should have the following:
- purchased an OUI and noted its number
- installed Docker and docker-compose (see quick-start for this in the next section, "Setting Up Dependencies")
- you have some spare HNT to burn ($10-100 worth), for funding your OUI address
- a Magic Link account for user account management. Note that without additional configuration, only login via link will work. Login via Google directly will not work.
- at least 4 vCPUs, 8GB of RAM, and 120 GB of SSD. The CPX41 product from Hetzner or the numerous VPS options from Vultr end up being cost-effective solutions. AWS provides equivalents such as t2.xlarge.
Optionally, you should also:
- have a fully sync'ed Miner or ETL instance to extract a snapshot from. To learn how to setup a Miner, please read here.
- be able to configure ports on a firewall
Setting up dependencies
In a fresh CentOS/Rocky/Alma Linux configuration, you can run the following installation step to prep the system for the rest of the tutorial.
First run:
yum -y update
yum -y install epel-release
yum -y install net-tools \
    htop \
    vim \
    git \
    python3-devel \
    openssl-devel

yum -y remove docker \
    docker-client \
    docker-client-latest \
    docker-common \
    docker-latest \
    docker-latest-logrotate \
    docker-logrotate \
    docker-engine
yum clean all
dnf config-manager --add-repo=https://download.docker.com/linux/centos/docker-ce.repo
And then:
dnf update
dnf -y install docker-ce docker-ce-cli containerd.io

systemctl enable docker
systemctl start docker
curl -L "https://github.com/docker/compose/releases/download/v2.3.3/docker-compose-linux-x86_64" -o /usr/local/bin/docker-compose
chmod a+wrx /usr/local/bin/docker-compose
Console Setup
Clone the console repo
git clone https://github.com/helium/console.git
Customize Console environment
cp templates/.env .env
Then edit .env. Here's an example of what it should look like:
SECRET_KEY_BASE=BgrSaMYa3lW/6l/3mN2/Op5u4bHw2FP4oPahBbFGgDhmtZ3cF9YwKx8/XH7SmOvNiglRXaH7c3inElVyc0XuWQ==
CLOAK_SECRET_KEY=SbxBSg47PNTHYe+1kY+KrlLXtL+gG/pFLcYseeBKh10=
GUARDIAN_SECRET_KEY=DtUzbwYhg48179r/kDtmH8lZtCmXN01ip1kOCnwQ6JI/4GqFv2ZNl3st7kXXB83brn6C/dkVU+BylrhWgyNG/w==
ROUTER_SECRETS=1647452465:++XKKmAwaoqz3OvAeH5PdR//Yk/znwYC8Xr+a98BRnf2l565PC3MXvti7j7u3fq4NxT7iQyX7lLL2y+0Udea0A==
ENV_DOMAIN=localhost:4000
SOCKET_CHECK_ORIGIN=http://localhost
DATABASE_DB=console
DATABASE_HOST=postgres
DATABASE_USER=postgres
DATABASE_PASSWORD=postgres
DATABASE_POOL_SIZE=20
BLOCKCHAIN_API_RETRY=1
OUI=22
SELF_HOSTED=true
In addition, you'll want to configure the Magic Link fields:
USE_MAGIC_AUTH=true
MAGIC_PUBLIC_KEY=pk_live_XXXXXXXXXXXXXXXX
MAGIC_SECRET_KEY=sk_live_XXXXXXXXXXXXXXXX
You may get these from your Magic Link dashboard upon selecting your app.
Customize Console Branding
Console Providers can customize their instance of Console UI including the ability to swap out images/logos, email content, and change footer links.
To customize your open source Console:
Copy app-config.json into config folder
cp templates/app-config.json config/app-config.json
Customize config/app-config.json as needed.
important
If you choose to customize your version of Console you need to build from source or your customizations will be overwritten.
To switch to building your own Console instead of using the quay image:
cp templates/docker-compose-server.yaml docker-compose.yaml
Customize Router environment
We will do something similar for .env-router:
cp templates/.env-router .env-router
Then edit .env-router. There are many options here to familiarize yourself with, but the only
necessary field to update is ROUTER_CONSOLE_SECRET. It must match ROUTER_SECRETS from .env.
Run it!
Copy the local docker-compose file
cp templates/docker-compose-local.yaml docker-compose.yaml
This template builds console locally and does not use nginx for SSL. You may want to read about nginx setup here.
If you launch docker-compose from here, you will build from the master branch. You can use git to
build and checkout alternate branches or tags.
Alternately, to avoid building at all, you can use a quay image by changing the image configuration in the console section to the following:
  console:
    image: quay.io/team-helium/console:latest
Once you've selected which branch of quay tag to use, docker-compose up deploys Conosle, Router
and Postgres.
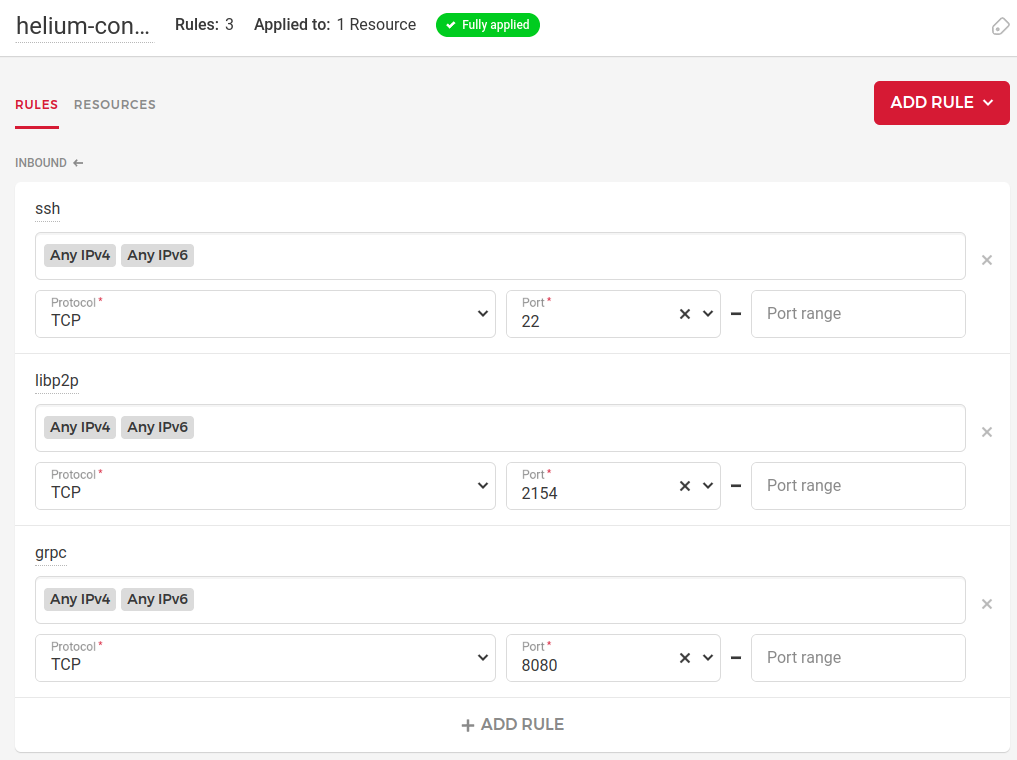
The first deployment can take a little longer, especially if you're building. While we're waiting, let's configure our firewall. Each cloud provider does this slightly differently, but you'll want to continue enabling SSH on port 22 so that you can accept your own login and management, open up port 2154 for libp2p which allows you to sync the blockchain, and finally, port 8080 is for gRPC connections from hotspots so that you may actually purchase packets:
You might see helium_router crash a few times as it waits for helium_console to start up and
allow the socket connection between the two.
You can forward the UX to your local machine with the following command:
ssh -L 4000:$CONSOLE_IP:4000 -N -f root@$CONSOLE_IP
This allows you to have local access to the web interface without opening up your firewall publicly.
Now, if you go to localhost:4000, you should have the Magic Link login available to you.
Load a snapshot
Optionally, you can load a snapshot so that your Console is immediately ready for action. Technically, the Router component of Console is what keeps up with the blockchain. You can check its current height
docker exec helium_router router info height
You are likely quite a ways from the tip of the blockchain, but you can load a snapshot from an active miner (or ETL instance or blockchain-node). Details about how to do this are here.
Simply replace miner with docker exec helium_router router for most of the commands to work.
Create Data Credits
At this point, we have the software running and we have an OUI, but the router does not have any DC to buy messages from the network. We need to burn some HNT to DC for the router.
The cost for rurning a router is complex. See community member disk91.com's guide and calculate how much you need for your planned usage. One million DC ($10) can be a good number to start with.
The easiest way to calculate how many HNT to burn to get the number of DC you need is to go to
https://console.helium.com/datacredits and click on Purchase Data Credits. Enter the amount of DC
you need and click on Burn HNT to DC. Helium Console shows how to burn the selected amount to the
Helium Console itself. We won't do that. Just note the amount (for example 0.49043649).
Let's get the address of the OUI/router.
$ docker exec helium_router router peer addr
/p2p/11xHXS5AgLyjYRCJ4ctcWcsMRULS8jro9Pb1GPaTG1neGk1dNcf
The string after the second slash, 11xHXS5AgLyjYRCJ4ctcWcsMRULS8jro9Pb1GPaTG1neGk1dNcf, is the
libp2p address and this is where we need to burn the DC. Now return to your command line wallet and
burn the HNT amount with the libp2p address of your OUI/router as payee. Example:
helium-wallet burn --amount 0.49043649 --payee 11xHXS5AgLyjYRCJ4ctcWcsMRULS8jro9Pb1GPaTG1neGk1dNcf --commit
Once this transaction clears, we'll be ready for the next step.
OUI Update
At this point, we have the software running and we have an OUI, but the blockchain does not know that the address of Router is associated with the OUI. Use the same libp2p address used in the previous step.
/p2p/11xHXS5AgLyjYRCJ4ctcWcsMRULS8jro9Pb1GPaTG1neGk1dNcf
Note run the following command with the same wallet used to purchase the OUI.
$ helium-wallet oui update routers --oui 4 --nonce 1 --address 11xHXS5AgLyjYRCJ4ctcWcsMRULS8jro9Pb1GPaTG1neGk1dNcf --commit
Once this transaction clears, the network will know about the association. It may take a few minutes, but once the transaction clears, your OUI will be able to open and close state channels and update your device table on the blockchain.
Monitor the account in explorer to verify that Router is doing this appropriately. eg:
https://explorer.helium.com/accounts/11xHXS5AgLyjYRCJ4ctcWcsMRULS8jro9Pb1GPaTG1neGk1dNcf
Create Data Credits
Many fees benefit from implicit burn, including when paying for OUIs and DevAddr's (done previously when you purchased an OUI, but your router needs a DC balance to run.
The cost for rurning a router is complex. See community member disk91.com's guide and calculate how much you need for your planned usage.
One million DC ($10) can be a good number to start with. The easiest way to calculate how many HNT
to burn to get the number of DC you need is to go to https://console.helium.com/datacredits and
click on Purchase Data Credits. Enter the amount of DC you need and click on Burn HNT to DC.
Helium Console shows how to burn the selected amount to the Helium Console itself. We won't do that.
Just note the amount (for example 0.49043649).
Now return to your command line wallet and burn the HNT amount with the libp2p address of your router as payee. For example:
helium-wallet burn --amount 0.49043649 --payee 11xHXS5AgLyjYRCJ4ctcWcsMRULS8jro9Pb1GPaTG1neGk1dNcf --commit
Test a Device
Login to your local Console instance (localhost:4000) and create an organization and a device. If you ever need help with Console as a user, much documentation exists here.
Once you've created the device on console, go to a terminal window on server running Console and
execute the following command to tell Router to update the xor filter on the blockchain:
docker exec helium_router router device xor --commit
Give the transaction some time to process (you can track it on explorer). Once it has been processed, you can try joining the device. If you see a successful Join Request, then you are successfully running your private LoRaWAN Network Server.
Congratulations!
Backing up your swarm_key
Extract the router's swarm key and store it somewhere safe. The swarm key can be extracted by
running base64 ~/console/data/router/blockchain/swarm_key and saved in your favorite password
manager. An alternative is to copy the file somewhere safe.
A Note on the Purpose of a swarm_key
The swarm_key equates to your validator's unique identity on the Helium blockchain. Backing up the
swarm_key enables you to maintain your router's identity in the event that your node becomes
compromised in some way, or needs to be rebuilt on another server for any reason.